Wednesday, June 30, 2010

A heavenly day, sunny and DRY...

Hooray! The muggies have left! The air is crisp and clean rather than feeling like it weighs a ton!


When I walked around the corner of the kitchen this morning, the shadows in the family room caught me off guard. The sun was streaming in, a soft breeze was blowing the trees, and their shadows were dancing all around the room as they swayed to and fro outside. Unfortunately, none of that beautiful movement was captured in my still photos.


Same shot, different camera/light setting... And can you guess what I did as soon as I took these photos? I turned off the air conditioning and threw open the windows! Heavenly!!!!

Monday, June 28, 2010

Seeing red...

The bee balm is absolutely exploding with color...


We planted red and purple monarda last year (or was it the year before?)...


...and it has grown and multiplied beautifully...


... calling to all the little hummingbirds who might be flying overhead.


The red blooms first. The purple will bloom later.


They're doing pretty darn good despite the fact that they are sun lovers who live in the shade...


... of the mulberry tree, cherry tree, and hemlocks...

Our garden is still a major work-in-progress. We hope to put down some temporary bark mulch paths around the plants within the next week or two....


And hopefully I'll be able to snap a photo of a hummingbird at the bee balm to share with you some time soon!... Donna

Thursday, June 24, 2010

Thrift store bowls and platters

We love salads and I serve most of them in the bowls and platters I've picked up at thrift stores...


Tonight we had a simple tossed salad, served in this large glass bowl. Perfect for salads - wide but not too deep.

On Father's day we had a hummus, artichoke, tomato and romaine salad with black olives and mozzarella cheese...


... served on this gorgeous blue and white platter.

I love the gold trim and design against the blue and white. The fact that it's worn is a bonus.

Bon Appetit! Be sure to visit My Romantic Home to see Cindy's gorgeous Show & Tell post and to find a list of all the other bloggers participating!! .... Donna

Monday, June 21, 2010

The Chip Whisperer....


(A photo of "Back Yard Chip." All of our Chips are named for the locations of their little holes/dens. It is Backyard Chip that appears in the following video)

A sweet little video of Amanda, home from the city for a few days, feeding Back Yard Chip out on the deck this week...
I think it was my good friend, Claudia, who used the term Chip Whisperer in a comment she left in one of my previous "Chip" posts. Love it! haha Bless the beasts and the children... Donna

Thursday, June 17, 2010

The welcome committee....

The seasonal decor may change on the front stoop...


...but the welcome committee never does.


During the spring and summer, colorful blossoms sit on the old bench... In the fall it's pumpkins and gourds, and in the winter it's outdoor poinsettias...


But Mr. and Mrs. Bunny are always peeking through or over whatever is placed around them...


They're our offical "welcome committee."


Last week our elusive bunny made an unexpected mid-day appearance.

We hadn't seen him in weeks, so we were quite excited to see him back again.


I think Mr. & Mrs. Bunny have a lot to do with attracting Mr. Wild Bunny to our yard. Twice he's been caught hanging out by the front stoop with these two. Neither time did I have my camera with me. Now that would be a picture!
Now hop on over to see Cindy (My Romantic Home) where you'll find a post on her beautiful new bed crown as well as a list of all the other bloggers taking part in Show & Tell Friday!

Donna

Thursday, June 10, 2010

A new use for an old box...

I've had this box in our family room for years now. But up until a couple of weeks ago, I had no idea this box once had a specific purpose!


Recently Claudia (Mockingbird Hill Cottage), posted about a beautiful pink floral glove box that she had purchased out in California. The size and shape is so similar to mine, I concluded that mine must also be a vintage glove box!


Now my little box has definitely seen better days. The quilted satin covering is very snagged, but that doesn't detract from its vintage charm... It was obviously used often and well loved.


And besides, with my little white dove perched on top of it, the snags aren't even noticeable. (The white dove was an old Christmas decoration that I liked too much to banish to the basement come January, so he has lived upstairs year-round for as long as I've had the box.)


I wonder what the previous owner, who lovingly stored her gloves in this box, would think of the current contents? As you can see, the box is the perfect size for the unsightly remote controls.


And now that they are stored in this beautiful box, they're so easy to find (unless they have been left behind sofa pillows or buried between seat cushions... the guilty parties shall remain nameless... you know who you are :)


Sweet little dove, you have my permission to peck the guilty parties until they return the remotes to the glove box!
Please be sure to visit Cindy at My Romantic Home for her Show & Tell post and a list of all the other bloggers participating this week!
Donna

Wednesday, June 9, 2010

Another bird cage planter!

In my last post I showed you what I did with my birdcage planter this summer.


I put it in our new swingset garden, using the same rusty white table that I've used in the past.
But this year, I broke all the home garden decorating rules and put (collective gasp!) FAUX ferns inside....

Last year, when it was up on the deck, it was filled with colorful flowers. (Here are the instructions on how I made mine.)


Ro Magnolia left me a comment that she had created her own birdcage planter after seeing mine. You must visit her at Soft Winds and Roses to see the birdcage planter she created out of this GORGEOUS old bird cage. Just look at the domed shape on top! An old beauty for sure! You'll love the transformation!!!

Donna

Monday, June 7, 2010

What a difference a year makes...

Okay, it's time for the big reveal! I know many of you could have banged out this project in a weekend, but since hubby and I work at a snail's pace, our swingset garden has been a year in the making, or at least a year in the planning!!

(click to enlarge any photos)

But let me tell you, it was worth the wait... It's even better than I had envisioned! Let me show you what a difference a year makes!
Gentlemen, move that Chip!
Summer 2009:


Summer 2009: The girls' old swingset, with so many wonderful memories that I couldn't bear to part with it, was the inspiration for this little garden/sitting area. The swings have been removed, but the sturdy wooden frame was the perfect starting point for this project!


Summer 2010: I just can't believe the difference in the before and after photos! A small deck, some plants, a little bark mulch and voila!


Summer 2009: We planted blue salvia in front of the swingset last year. It was pretty much the first piece of the entire project.


Summer 2010: I think it likes its new home because it came back strong and full this year.
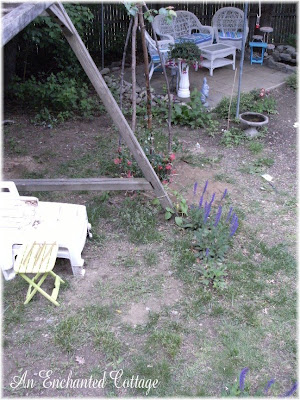

Summer 2009: The grass in this part of the backyard is virtually non-existent...


Summer 2010: The deck and bark mulch took care of the lack of grass in much of this area. Now we're trying to decide whether to put down a ground cover or to reseed the remaining area.


Summer 2009: Another view of the swingset and the steps that lead up to the deck.


Summer 2010: That's better... Much more inviting!


Summer 2009: Last year we planted two climbing hydrangeas, one on each of the back posts of the swingset...


Summer 2010: They are thriving, but they're also s-l-o-w growers!


Summer 2009: We hope that eventually the hydrangeas will climb up the back posts and then travel across the top of the swingset.


Summer 2010: Their foliage is so lush and thick, I think that would be so beautiful!


Summer 2009: View from our patio. We planted this little honeysuckle vine on our homemade obelisk last year.


Summer 2010: The honeysuckle vine has now climbed to the top of the obelisk and the hummingbirds love to split their time between the feeder the the honeysuckle. The swingset deck and the patio both provide wonderful viewing areas!
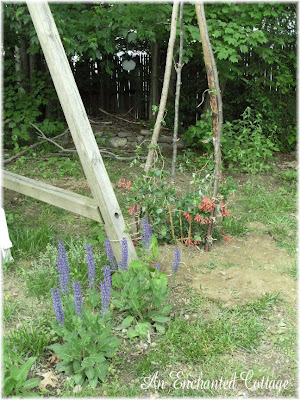

Summer 2009: Another view of the salvia and honeysuckle vine right after it was planted last year.


Summer 2010: I thought my vintage birdcage planter might look nice placed between the salvia and the honeysuckle. Although this year I got lazy. Instead of real flowers, I just stuck some faux ferns into the cage. I've never used faux anything in the outdoor garden areas before, but I actually think it looks okay (Right, Jill?) (Click here to see my post on making a birdcage planter for your garden).


In addition to the climbing hydgrangeas on the back swingset posts, I planted clematis vines on the two front posts. There are also some pink lilies in front of a little birdbath in the garden. And Ms. Mermaid, who you see sitting on the bottom step, is loving the garden. And she has already made a very special friend! I hope to get a picture of the two of them to share with you sometime soon!

So thank you for letting me share our new garden sitting area with you. And a huge thank you to hubby, who made it all possible!!!

Donna