Showing posts with label DIY. Show all posts

Thursday, June 21, 2012

Vintage Bird Cage Planter for the Garden, a DIY project


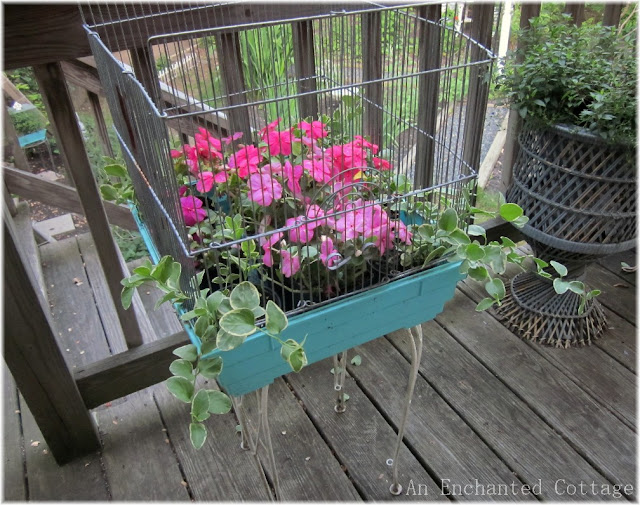
 I finally got around to setting up this year's bird cage planter!

For a while, it looked like we were going to attempt mounting the bird cage to the top of our birdhouse pole. We honestly didn't think we'd be able to put the birdhouse together again once it broke into dozens of pieces after a winter storm. Thank goodness we were able to save it (blogpost about the birdhouse here).

 It's so easy to make these birdcage planters. Most of the cages have tops that can be removed. If your cage has a tray, take that out so the water can drain out when watering. Just arrange your plants, and if you have any trailing plants (I put a vinca vine in each corner), gently pull the vines through the cage bars.

Once I had my vinca vine and impatiens arranged, I decided to add a garden statue (I should have thought of that before and arranged the flowers around the statue).

I decided on these two lovebirds as they're tall and will still show as the flowers get taller. I just pushed the flowers aside to make room for the statue. (The flowers and vines are all in their original containers from the garden center).

I love the little domed door and ornamental scroll work on the door of this old cage, not to mention the aqua blue base!

 I have an old white table that I use for this bird cage planter every year. It's the perfect size!

 The location on the deck changes from year to year. This year it's over by the fountain, which is also in a different location this year.

 It is so relaxing to sit out here on summer days and evenings (until the mosquitoes crash the party!)

 Generally there's no tablecloth on the table as I'm sure it could easily blow away on a breezy day. But I have several old, vintage tablecloths with minor stains or holes, and they're perfect to throw over the table when we are out there.

 And would you look who's been watching me take photos out here! I tossed a few peanuts in front of the slider and the Chips have been keeping her entertained! They all know by now that she's on the other side of the screen and therefore they're safe!

This is the baker's rack that you see in the background of the previous photo. Nothing special going on here. Just my always reliable impatiens and a few ground cover flats that will get planted in the fall. I love using ground covers for 'display' on the deck and around the yard until they get planted in the fall.

AS a matter of fact, here's another bird cage planter I have down by our swingset deck this year. It's very similar to the cage up on the deck, but a smaller size. I just stuck a ground cover inside of it for the summer months and then I'll plant it this fall.

 I'll have to share before and after photos of our honeysucke vine in the background. We planted that to climb a homeade obelisk a few years ago and it has done amazingly well in this spot! (The hummers agree!)

If you need more info on making birdcage planters, I have a DIY link on my sidebar that gives a bit more information. Check it out if you have any questions!

Enjoy the weekend, everyone!

I'm hooking up to My Romantic Home's Show & Tell Friday this week.

Donna


Thursday, June 7, 2012

When Children Grow Up...

Some of you might remember when I posted about our Swingset Deck project here,
complete with [hideous] before & [much better] after photos.

Our two girls, now in their 20's, outgrew their swing set many years ago...

But because of memories like these, and me being the overly sentimental fool that I am,
I couldn't bear to part with their old wood swing set...

... so it became the inspiration and framework for a backyard sitting area where
climbing hydrangea and clematis will be crossing the monkey bars rather than two little girls.

The story isn't too different for the Gnome Home  
(so called because of its current lone inhabitant).

Once upon a time, long before Mr. Gnome
called this place home...

... two wonderful, silly little girls inhabited this magical place,
built by their daddy just for them.

 They spent countless hours laughing and giggling
in this magical little place...

... so magical that they were even able to entice our old Mr. O'Malley
to climb the ladder stairs and join in on the fun!

But children have a way of growing up (much too fast) and
leaving swing sets, tree houses, and all their sweet memories behind...

And no matter how much we'd like childhood to hang on
for just a wee bit longer...

...it's not part of nature's plan.

And so these days, it is little bunnies who frolic by the base of the tree house...

...and a family of birds who wind their way from the birdbath to the ladder steps
to pay Mr. Gnome a visit.

But sometimes when it's very quiet, while I'm out watering flowers or filling bird baths,
just sometimes an enchanted breeze will gently blow through the treehouse...

... and stir up memories so real that I swear I can still hear
two little girls laughing and giggling from inside.

Wishing you all the loveliest memories in your own enchanted gardens.

Donna

This week I'm joining
Tracie's Cottage Garden Party at Fishtail Cottage
and  Show & Tell Friday at My Romantic Home.

Friday, May 25, 2012

DIY Screen Feeder - Flower Box

 Since I had a couple of questions, I thought I'd clarify some information regarding yesterday's post, where I showed how I use our bird seed screenfeeder as a 'window box' in the summertime. I purchased our screen feeder on-line (I don't remember where, but if you do a Google Shopping search for "screen feeder tray," you are bound to find some! I'm sure a local bird store would carry them, and perhaps even larger nursery or garden centers.)

As I mentioned, I just plunk the flowers down in their original (lightweight) containers, right on the screen feeder, as I don't think the screen feeder would stand up to the weight of flowers that have been transplanted into pots (due to the weight of the pots and all the extra soil).

I decided to experiment with lavender this year because I love the scent.

I'm not sure how the lavender will do because a) this window is not an extremely sunny spot, and b) I've never used these biodegradable pots before, just sitting out on their own without being planted in the ground or a bigger container. They may end up needing more watering than the plastic 6-pack pots I've used in the past. I"ll keep you posted.

I may not be sure how the lavender will perform, but I do know from years past that impatiens lend themselves to this method so I used them around the lavender pots. I was able to use complete 6-packs in front of the lavender...

...but there wasn't enough room for a complete 6-pack on each side of the lavender so I just used my scissors to cut one of the plastic 6-pack pots in half so they'd fit on each side.

Here's a sample of last year's 6 packs at the beginning of June, shortly after I'd plunked them down on the screen feeder. I also stuck a vinca vine pot into the front corners. As you can see, the vinca vine isn't very long and the black plastic 6-pack pots are still visible.

But just 5 weeks later, by July 5th when this picture was taken, the Vinca Vine was almost down to the ground and the flowers had cascaded over the sides of their little black 6-pack pots.

I use the same "planting method" with these old vintage planters that I have on our Swingset Deck. I just plop 6-packs of impatiens down in the planters and rearrange them until I like the color arrangement...

... and voila! This photo was taken on July 8th, 5 weeks after they were first plopped down. They absolutely thrive in just their original little 6-pack pots!

The most important thing is to make sure they're watered every single day. I sometimes even water twice during our horrendous heatwaves here in New England. I've toyed with the idea of using Spanish moss or Sphagnum moss underneath the 6 packs on both the screen feeder and in these planters, but I've never gotten around to actually trying it. That might keep the bottoms more moist, but that's just a guess on my part.

So good luck to anyone who tries this! I'd love to know what other types of flowers work well with this method. I know I can vouch for impatiens!

(Sammy Squirrel giving thanks for the bounty he is about to receive. Amen.)

And I know I am going to get out and enjoy our little backyard this summer because all too soon the screen feeder will be filled with seed, cracked corn, and suet rather than flowers (brrrrrrrrrrrrrrr!)

Happy gardening!!
Donna

Thursday, May 10, 2012

DIY Lint Roller Holder...

If you have one (or more) of these...
 (photo edited in PicMonkey)


...then you probably have a dozen (or more) of these!

A couple of months ago the incredibly talented Brenda from Cozy Little House came up with a GENIUS solution for storing these sticky little lint rollers (click the link above to see her post). She used a tin can with the label removed to house her lint roller! Now why didn't I think of that? Mine is always stuck in the bottom junk drawer, adhered to everything surrounding it!

I used Brenda's idea as a jumping off point to make my own Baby fur remover... I mean lint roller holder!  I used brown scrapbook paper to make this for one of my girls to keep at her new apartment.

 Then I picked out a couple of more scrapbook papers to make some for myself.

 I couldn't resist adding Baby's picture to the green striped one. It picks up the green in her eyes!

Although Baby was originally a little miffed at the insinuation that it is mostly her fur around the house and on everyone's clothing (which it is), she has had a change of heart and enjoys seeing her pretty face on the new lint roller holder that sits out on the counter. 

Easy instructions follow if you'd like to make one of your own! I know a LOT of you are pet lovers out there and this is a stylish way to always have a lint roller handy and unstuck!!

(click / double click to see instructions full sized)

Have a wonderful weekend and a Happy Mother's Day, everyone!


(And Happy Birthday to my beautiful mom, who would have been 86 today. I love you, Mom!)

I'm linking to Cindy at My Romantic Home for Show & Tell Friday.

Donna

Thursday, September 16, 2010

Make your own PHOTO Pumpkin!

I thought this might be a good time to repost a fun project that I shared last year. After all, Halloween is right around the corner, and the stores are full of faux pumpkins right now, so it seems like the perfect time!


So gather up some of your favorite Halloween photos of pets...


... or children...


... or both!


....and then click HERE for Step-by-Step instructions on how to create your own PHOTO PUMPKINS!! (What a great gift for a grandmother - the little ones all dressed up in their trick-or-treat costumes!!!)
Now pop by to see Cindy at My Romantic Home for her Show & Tell Friday post and a list of all the other bloggers participating!
Happy Autumn everyone!
Donna