Photo Pumpkin Instructions
Comment Response: This project was done on artificial, store-bought pumpkins. I'm not sure how it would turn out on real pumpkins, but feel free to try. Unfortunately, the pumpkins would need to be tossed at the end of the fall season as I doubt they'd keep from year to year...
So here we go with the step-by-step instructions!
Be sure to let each step dry completely before going on to the next step. (See
yesterday's post for the list of supplies needed for this project. I sure wish I could have found white pumpkins rather than orange to start with - it would have saved me a few steps!)
 (you can click on any of the photos for a larger, detailed image)
Step 1)
(you can click on any of the photos for a larger, detailed image)
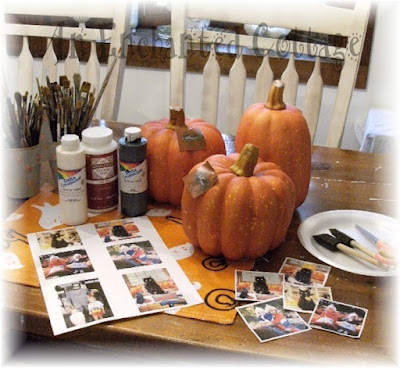
Step 1) Gather your supplies. You can use any size pumpkins, but be sure the copies of your photos are smaller than the height and width of your pumpkins. Trim your photos. I left a thin white border around mine.
(Tip: I printed mine on my inkjet printer. You may have some color bleeding with inkjet copies, just as I did, during the decoupage step. I believe there's less chance of bleeding if you use actual Xerox/photocopies from a print shop or photos printed on a laser printer.)
 Step 2)
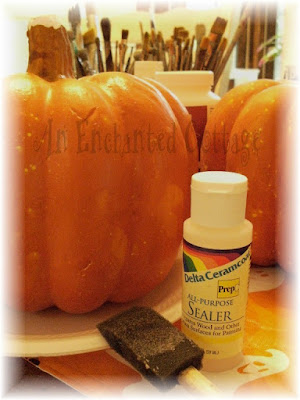
 Seal the entire pumpkin to keep the color from bleeding through.
(Note: The orange of my pumpkins still bled through the new paint job a bit, visible if you enlarge my photos... I don't know if there's a way to stop this completely...Maybe use 2 coats of sealer? I only used one. Luckily, the orange peeking through here and there adds a bit of unexpected character!)
 Step 3)
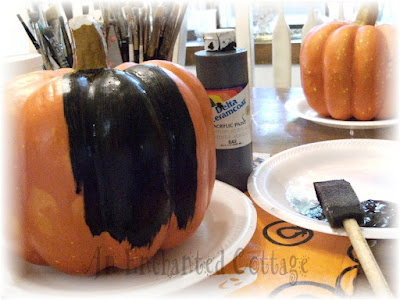
 Paint the pumpkins Black. It will give you better coverage when you apply your final color over black rather than trying to paint over orange.

Originally I was going to leave the stems natural, but then decided to paint them black. It's a personal choice. If you plan to paint them black, you can do so at this point.
(Lisa at The Pickled Hutch said they'd look great having photos added at this stage of the game, too! Now why didn't I think of that?)
 Step 4)
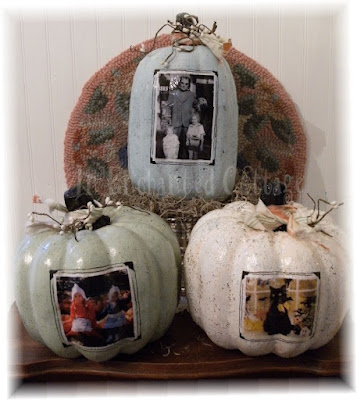
 It's now time to paint the pumpkins with your color choices. I chose white, green, and pale blue. As you can see, I'm starting to paint this one white.
(It looks like a bundt cake with icing dripping down, doesn't it?)
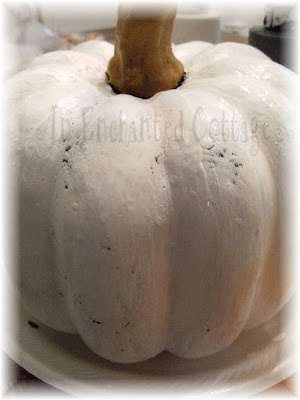
Good enough! Now to let it dry.
 Step 5)
 Choose the first photo you want to use on the pumpkin....

Put it face down on a clean surface and apply a generous coat of decoupage to the back of the photo...

Just eyeball the photo to center it from top to bottom and left to right, and then press the photo onto the pumpkin. While the decoupage is wet, you'll be able to move it around to straighten it. Because of the ridges in the pumpkin, the photo will not lay completely flat. Just do the best you can to press it down into the ridges, and to press the edges down flat. (Sometimes a folded paper towel is easier than using your fingers to press and rub.) Repeat this process for as many photos as you are putting on the pumpkin (I did one on the front and one on the back).
If you enlarge some of my photos, you will see that there are slight creases and wrinkles in the photos due to the pumpkin's uneven surface/ridges, but that won't ruin the overall look of the finished project.)
 Step 6)
 When dry, apply one thin (but complete) coat of decoupage over the photos so they are completely sealed. If you over brush the decoupage, it could lead to photo bleeding (if done on an inkjet printer). After you hve applied the decoupage medium, the photos may initially look milky white/foggy. Don't worry. Once the decoupage medium has dried, the images will be crystal clear.
 Step 7)
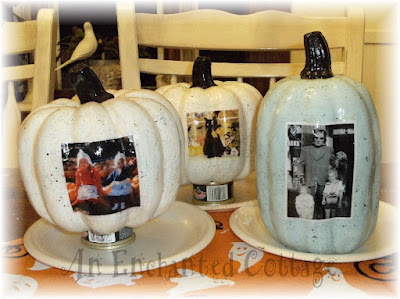
 Once the decoupage has completely dried, it's time to apply a coat of varnish to the entire pumpkin including over the photos and the stems. I used Delta Interior/Exterior Gloss Varnish, a craft varnish that easily cleans up with soap and water. I set my pumpkins on top of small cat food cans so the bottoms could dry as well.
 Step 8)
 OPTIONAL STEP: Now it's time for you to get really creative! I chose to "spatter" my pumpkins with some black paint, and also paint on some simple black lines and 'vintage' style photo corners around the photos so they'd stand out. But you could do anything at all - vines, flowers, wavy lines, dashes, dots. You could even paint a silhouetted scene around the pumpkin (I want to try that next year!!) You could also paint polka dots or stripes all over! Because you have already varnished your pumpkin, if you make a mistake, it's easy to use a damp paper towel to "erase" a line or whatnot and start over again. (
Here's a link to the pink polka dotted pumpkin I painted.)
Step 9) If you did add add any decorative details outlined in Step 8, it's now time to varnish your pumpkins again in order to seal the finished product.
 Optional:
 For the finishing touches, I just ripped some scrap material into short 'rags' for around the stems (I also snipped a few small faux berry sprigs from a garland to tuck in around the rag strip. You could also use ribbon, raffia, or jute if you'd like.
So that's it! I hope you enjoy making your own photo pumpkins!! If you have any questions, feel free to e-mail me...
Donna


