Friday, January 29, 2010

My brown thumb.... or why I love faux...

Brown Thumb: (noun)


Definition: Lack of skills at growing plants; something possessed by a poor gardener.

Used in a sentence: I have a terrible brown thumb. I could probably kill silk flowers.


Brown thumb images: see An Enchanted Cottage's 1/29/2010 blog post


We won't even get into the layer of dust on the ceramic bird or the dead leaves all over the battenburg table runner. Wait a minute... do I still see hints of green in there? Let's see if I can bring these babies back to life (running to get the watering can).

While taking photos of the "brown thumb" gang, the bluejays kept a vigil on the deck, waiting for peanuts (it is bitter, bitter cold in Massachusetts today)... So I tossed out several handfuls of peanuts to the birds and squirrels and then stepped back and took this photo of the first bluejay that swooped down to grab a treat as reflected in the family room mirror. (Ignore the wayward peanut that rolled under the carpenter's bench.) I didn't even notice it until I up?/down?loaded the photos onto my computer. It has now been tossed out on the deck as well...

I hope you're all staying warm (at least in our area where we're experiencing the coldest weather of the winter season)...


Donna

Saturday, January 23, 2010

snowbirds...

In addition to the beauty of a winter's snow (as you can see, I'm really trying to focus on all the positives of winter since it will be camped in my back yard for at least another month!)...


...we're treated to the sweet little juncos that arrive along with old man winter.


This is the view outside my dining room window. The ivy covered chimney and old picket gate, the arbor and fence were all coated with a heavy white snow after our last storm.


The juncos love to perch on top of the gate pickets between trips to the screen feeder which is located right outside the dining room window.


Another reason to embrace winter ... juncos.

Donna

Wednesday, January 20, 2010

a game of cat and mouse...

...or in this case...


... hawk and squirrel. I've seen this big guy in our yard several times over the past few weeks, often because I hear the ruckus being raised by the crows. But this time, it was the frenzied scattering of birds from the window screen feeder that caused me to look out.


My worst fears... One of our Sammies, who are like our outdoor pets, was being swooped down on by the hawk. Luckily, Sammy was able to get away...

He hid out on top of the tree house...

...while Mr. Hawk hung out on the lower rung of the tree house after Sammy's great escape.

They stayed that way for quite some time before Sammy finally ventured into the trees. Mr. Hawk stayed on the treehouse a bit longer before spending some time on a fence post and then flying off...

This was the view out my window yesterday... the second snowfall in as many days.


I'm trying to live in the moment and enjoy the beauty of this latest winter storm... and I really do appreciate the cloak of white that covers every shrub and tree in our yard. It's breathtakingly beautiful. But that doesn't mean I can't be counting the days until little buds are bursting forth from those same shrubs and trees.... right?


Donna

Thursday, January 14, 2010

with heart in hand...

I promise this is the end of the handmade Christmas gifts! I'm sure you've all seen the jewelry hands for sale in a variety of stores... I decided to buy one for each of my girls, but in keeping with our handmade Christmas, I gave the hands a makeover and personalized them.


And since "hearts" figured prominently in the makeover, I thought I'd share them with you in case any of you are looking for Valentine gift ideas!


The hand on the left was stark white with silkscreened green vines and pink roses... The hand on the right was matte black with an ornate gold cuff. The first thing I did was apply sealer to both pieces and paint the hands creamy white. I then 'tattooed' a little black heart on each palm.


Left: With the help of a little craft paint, the gold ornate cuff was transformed into a blue-green/turquoise-ish cuff (Amanda loves all shades of blue). Right: I glued inexpensive pearl beading (a junktique store find) around the wrist of the other hand to dress it up a bit (Courtney likes pearls). Amanda's hand got a coat of clear pearlescent paint on the nails because she rarely wears nail polish; Courtney, on the other hand, is always applying nail polish so the nails on her hand got a coat of pretty rose pink paint!


The final touch was this quotation that I painted on the bottom of each hand, which fit right in with the "hearts" and "hands" theme.
"A mother holds her children's hands for a while, their hearts forever."
And there you go - that's the end of the Christmas gift posts... Promise!
Good luck to all of you who are going to be making photo canvases! I hope you have lots of fun! Let me know how they turn out! .................. Donna

Tuesday, January 12, 2010

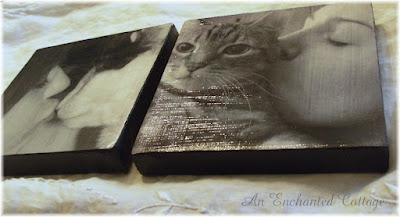
canvas photos...

Can you stand more of our homemade Christmas? This is a very inexpensive gift idea and so simple...


Buy any size canvas. I used 5" x 5" gallery wrapped so there were no staples on the sides.


Resize and crop your favorite photos so they're the same size as the canvas and print the photos on your home printer.


Paint the sides of the canvas whatever color you'd like. I chose to print my photos in black & white rather than full color, so I painted the sides of mine black.

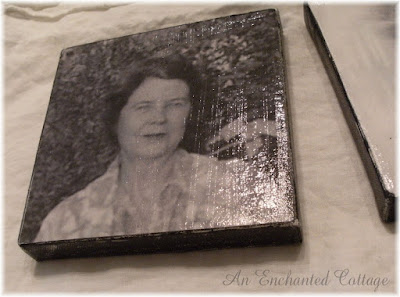
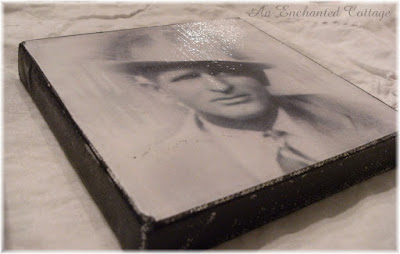
Apply decoupage to the back of the photos and then press them firmly onto the canvas. I used a clean paper towel to kind of work the bubbles out and "press" them into place. When dry, I applied one coat of decoupage medium horizontally, let it dry, and then applied a second coat vertically and let that dry. (I think brushing on one coat in each direction gives them a linen-like texture.) The final step is brushing on a coat of high gloss varnish.


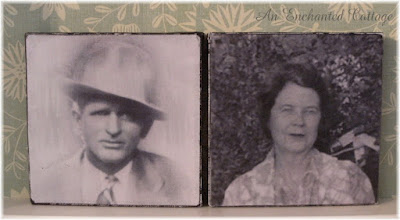
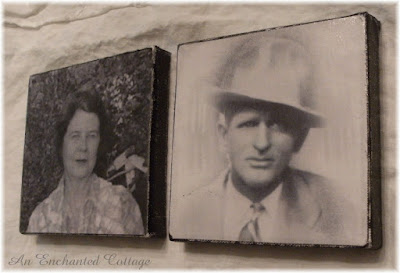
I also made a set of canvas prints for hubby for Christmas. He has very few photos of his parents so I scanned and enlarged some old (small) photos of them.

Naturally when you enlarge photos, you lose definition and there is some blurring, but for this project I think it worked to my advantage. I love the way they turned out.


I followed the same procedure as I did for the girls' photos, except I sanded the sides to distress them and give them a worn look...


I have one more project to share with you in my next post, and it's one that might come in handy for Valentine's day...

Until then, have a wonderful week!
COMMENT RESPONSE & A LITTLE MORE INFO ON THIS PROJECT:
I had no idea so many of you might want to try this project, so I'm going to answer a question and give a bit more detail:
Decoupage medium can be purchased at any craft store and in most craft sections of department stores. It's a thick, white gluey substance that dries clear, and it allows you to adhere photos, clippings, scrap paper (or pretty much anything) to other surfaces.
1) I have just an inket printer, and their inks do tend to smear. Here's a tip on avoiding that:
For your first application of decoupage medium (whether you apply it vertically or horizontally), make sure you have enough decoupage medium on your brush to make one full pass from side to side so that you're not brushing over the same area multiple times, which could make the ink tend to smear, especially if you're using an inkjet printer. (I believe there's much less smear-potential with laser prints and copy center prints. But if you're careful, it can be done on photos from an inkjet as that's what mine were.)
2) I actually ran out of regular printer/copier paper while working on hubby's parents, so I used some white card stock I had on hand. As it turns out, that weight paper worked just as good (maybe even better!).
3) One thing to watch for after youve applied the decoupage and pressed down your photo is excess decoupage that might have squeezed out. Just wipe it off the sides of the canvas if there are any big gobs or runs.
4) Don't be alarmed that you can't see your photo through the milky white decoupage medium at first. It ends up drying completely clear.
5) And lastly, I had to completely redo one of my first attempts because I applied decoupage medium to both the canvas and to the back of the inkjet photo before pressing the photo to the canvas. (I think those were the instructions on the back of the jar.) I had so much trouble trying to reposition my photo to get it just right. I found that applying decoupage to just the back of the photo made it MUCH easier to work with. Just make sure you have all the edges covered so they will adhere nicely to the canvas. You don't want the outer edges of your photo popping up from the canvas.
If anyone has any further questions, please feel free to ask. I hope you all have fun!


Donna

Tuesday, January 5, 2010

Before Christmas is totally packed away...

I wanted to share the newest ornaments to grace our tree... Every year since the girls were born, I've added a photo ornament of each of them to the tree. And since they're now 20 and 24 years old, that's a lot of ornaments!!


Last year's ornaments were photos of the girls wearing the cloche hats they got that Christmas.


This year Court's ornament features a sweet photo of her with her handsome Spotty, who we lost in November. I just love this picture of the two of them...


Amanda's ornament features a photo of her planting a kiss on her sweet Tiger. I love this picture, too. This year the theme was obviously kitty love. Both of these photos were also part of their handmade gifts this year and I'll show you those projects soon.


In addition to the photo ornaments, I buy an ornament for each of the girls every year. Someday when they have their own places (with room for a tree), they'll take all their ornaments, and the memories attached to them, to their new homes. This year I fell in love with these crown ornaments from pinkbuttercreme's ETSY shop.
I gave Amanda the white bird adorned with a sparkly princess crown, lace ruffles, and a rosette...


... and I gave Courtney the same ornament in pink. Aren't they GORGEOUS? Be sure to visit PinkButterCreme's shop - she'll be reopening January 15th with lots of new Valentine's goodies!


And then I came across another ETSY shop with the most adorable vintage styled tinsel ornaments - just look at these sweet kitties...


...and handsome hounds!!! They are the unique creations of Stephanie at Old World Primitives and they're just the cutest things ever!


Here they are, out of the package, so you can see them better. I couldn't decide between the kitties...


...or the doggies, so I had to get both!


Be sure to visit Stephanie's ETSY shop where you'll find more of her kitty and doggy ornaments as well as Valentine and Easter ornaments in this same style!
I also want to mention that both of these shops offer EXCELLENT customer service - quick shipping, friendly correspondence - the works! I guarantee you won't be disappointed!
Hope you're all enjoying the start to the new year. We're surviving the weekend's snow, but longing for spring!!
Donna